
Taking screenshots on a laptop or desktop computer can be done using built-in keyboard shortcuts or third-party software, depending on your operating system. Here are instructions for taking screenshots on Windows, macOS, and Linux:
How to Take Screenshots on Windows:
Capture the Entire Screen:

- Press the PrtScn (Print Screen) key. And then continuously
- Press Win + Shift + S (Windows 10 and later): This opens the Snip & Sketch tool, allowing you to select an area for screenshot capture.
Capture the Active Window:

- Press Alt + PrtScn: This captures the currently active window and copies it to your clipboard.
Capture a Specific Region:
- Press Win + Shift + S (Windows 10 and later): Use the Snip & Sketch tool to select a specific area of the screen for capture.
Using the Snipping Tool (Windows 7 and 8):

- Search for “Snipping Tool” in the Start menu, open it, and use it to capture specific areas of the screen.
Screenshots Folder:
- The screenshots taken using the PrtScn key are saved in the “Screenshots” folder under the “Pictures” library in Windows.
How to Take Screenshots on macOS:
Capture the Entire Screen:

- Press Shift + Command + 3: This captures the entire screen and saves the screenshot as a file on your desktop.
Capture a Specific Region:
- Press Shift + Command + 4, then drag to select the area you want to capture. The screenshot is saved as a file on your storage specific place.
Capture a Specific Window:
- Press Shift + Command + 4, then press the Spacebar. Click on the window you want to capture to press a size on mouse. The screenshot is saved as file on desktop.
Using the Screenshot App like (macOS Mojave and other):
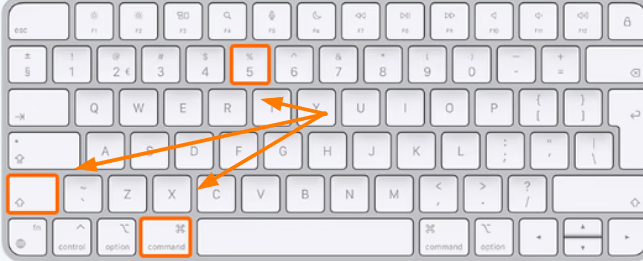
- Press Shift + Command + 5 to open the screenshot utility, which provides options for capturing various types of screenshots.
How to Capture image Screenshots on Linux:
The screenshot methods on Linux can vary depending on the desktop environment you’re using. Here are some common options:
Capture the Entire Screen:
- Press PrtScn key: This captures the entire screen and saves the screenshot in your home directory or a designated folder.
Capture a Specific Region:

- Press Shift + PrtScn or Ctrl + Shift + PrtScn, depending on your desktop environment, to select an area for capture.
Capture a Specific Window:
- Use the built-in screenshot tool specific to your desktop environment. For example, GNOME has a screenshot tool that allows you to capture specific windows.
Using Third-Party Tools:
- You can also install third-party screenshot tools like “Shutter” or “Flameshot” for more advanced screenshot features.
To check your specific Linux distribution and desktop environment for any variations in screenshot methods and available tools.
Conclusion
These methods should cover the basics of taking screenshots on Windows, macOS, and Linux systems. Choose the method that suits your needs and operating system, and start capturing your screen as needed.

